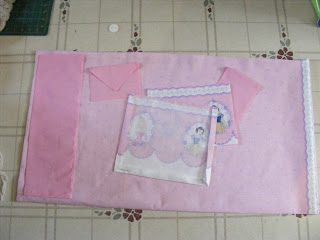
Today, I decided to make a wall hanging organizer for the girls' room. I found the PERFECT fabric for the little Princess Lovers!
What I did was cut the trim (the Princesses) off of the bottom of the fabric. Then, I made random little pockets. Cut a square, cut a rectangle... it doesn't really matter. I just played! I cut two princesses into rectangles and then found another pink bit of fabric to make two smaller pockets and the third longer pocket.
I ironed a seam onto each "pocket" then sewed it down. Then, I ironed down the reaming 3 seams on each one.
Next, I laid out their locations and pinned them down, then sewed down the 3 sides of the pockets to the front side of the full panel.
This pocket I made a pencil holder. I "quilted" straight so pencils, pens or markers would fit nicely inside each!
The envelope-like pocket was trial and error. I folded, ironed and played with it until it looked right. Sorry, I just can't give any more direction than that!!
After all the pockets were sewn on to the panel, I folded the panel in half and ironed a seam into the side. I turned it wrong side out (right sides together) and hemmed the bottom and side together. Then I turned it right side out, and ironed it flat.
Lastly, I folded over the top to create a hanger. I made the flap big enough to fit the ribbon thru and then sewed it to the backside of the panel. (I mitered the corners so they didn't show.) Fed thru the ribbon, tied a bow and BAM! It's done!
There's five pockets, but the bottom one is sewn down in the middle to make 2 pockets. I could have added another one, but opted not to.
I didn't have a pattern, I just decided to "play" until it worked for me. Sorry if that's a little vague!


Very Cute Laura! It turned out great! I bet the girls will LOVE it!:)
ReplyDelete